A customer complained that every time he bought vanilla ice cream, his car would not start. But when he bought chocolate, strawberry, or any other flavour, the car started normally.
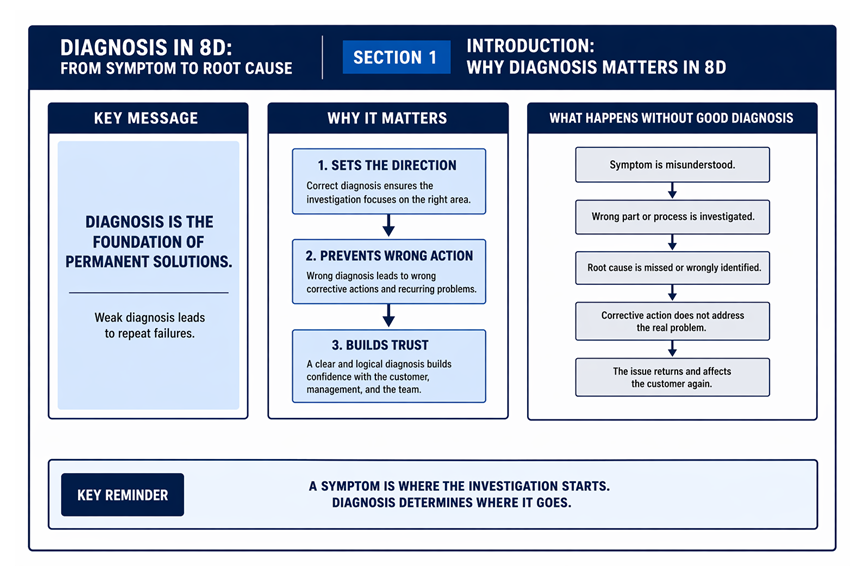
At first, the complaint sounded ridiculous. Many engineers would have dismissed it immediately. But after proper diagnosis, the company discovered that vanilla ice cream was stored closer to the entrance of the store, so customers buying vanilla returned to the car faster. The engine did not have enough time to cool, leading to vapour lock and a no-start condition.
The flavour was never the problem. The timing was.
This is exactly how many teams approach 8D problem solving.
They see the visible symptom and rush toward the first logical explanation. Operator error, supplier issue, machine variation, handling damage, lack of training. But in many cases, the real issue sits deeper in the process, hidden behind conditions, timing, interactions, process variation, system weaknesses, or escape points.
That is why diagnosis is the silent discipline of 8D problem solving.
A team can have good containment, detailed reports, and multiple corrective actions, but if the diagnosis is weak, the same problem will return in a different form.
Strong diagnosis is what separates permanent problem solving from structured guesswork.
Understanding the Path from Symptom to Root Cause
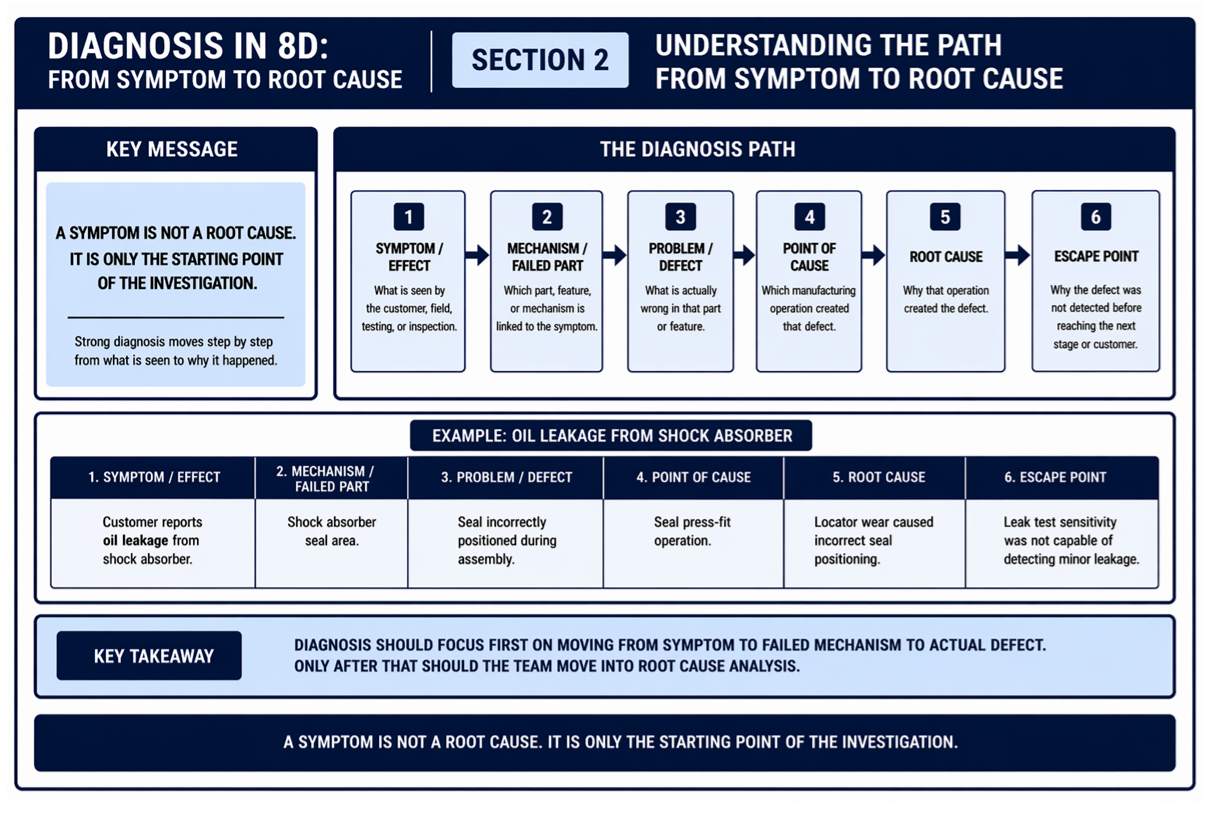
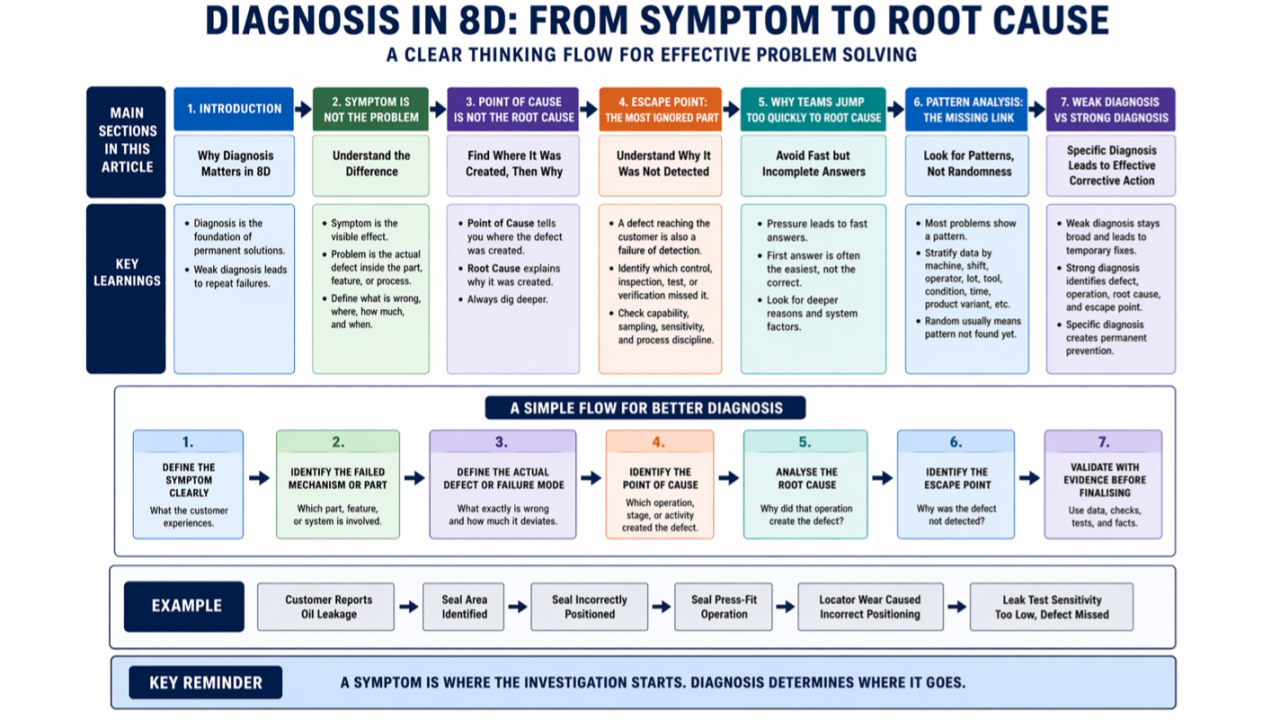
Many teams jump directly from symptom to root cause. That is where most investigations become weak. A better way is to move step by step:
- Symptom / Effect : What is seen by the customer, field, testing, or inspection
- Mechanism / Failed Part : Which part, feature, or mechanism is linked to the symptom
- Problem / Defect : What is actually wrong in that part or feature
- Point of Cause : Which manufacturing operation created that defect
- Root Cause : Why that operation created the defect
- Escape Point : Why the defect was not detected before reaching the next stage or customer
For example:
- Symptom / Effect: Customer reports oil leakage from shock absorber
- Mechanism / Failed Part: Shock absorber seal area
- Problem / Defect: Seal incorrectly positioned during assembly
- Point of Cause: Seal press-fit operation
- Root Cause: Locator wear caused incorrect seal positioning
- Escape Point: Leak test sensitivity was not capable of detecting minor leakage
This flow is important because diagnosis should focus first on moving from symptom to failed mechanism to actual defect. Only after that should the team move into root cause analysis.
A useful reminder is:
A symptom is not a root cause. It is only the starting point of the investigation.
Why Many 8D Reports Fail to Prevent Recurrence
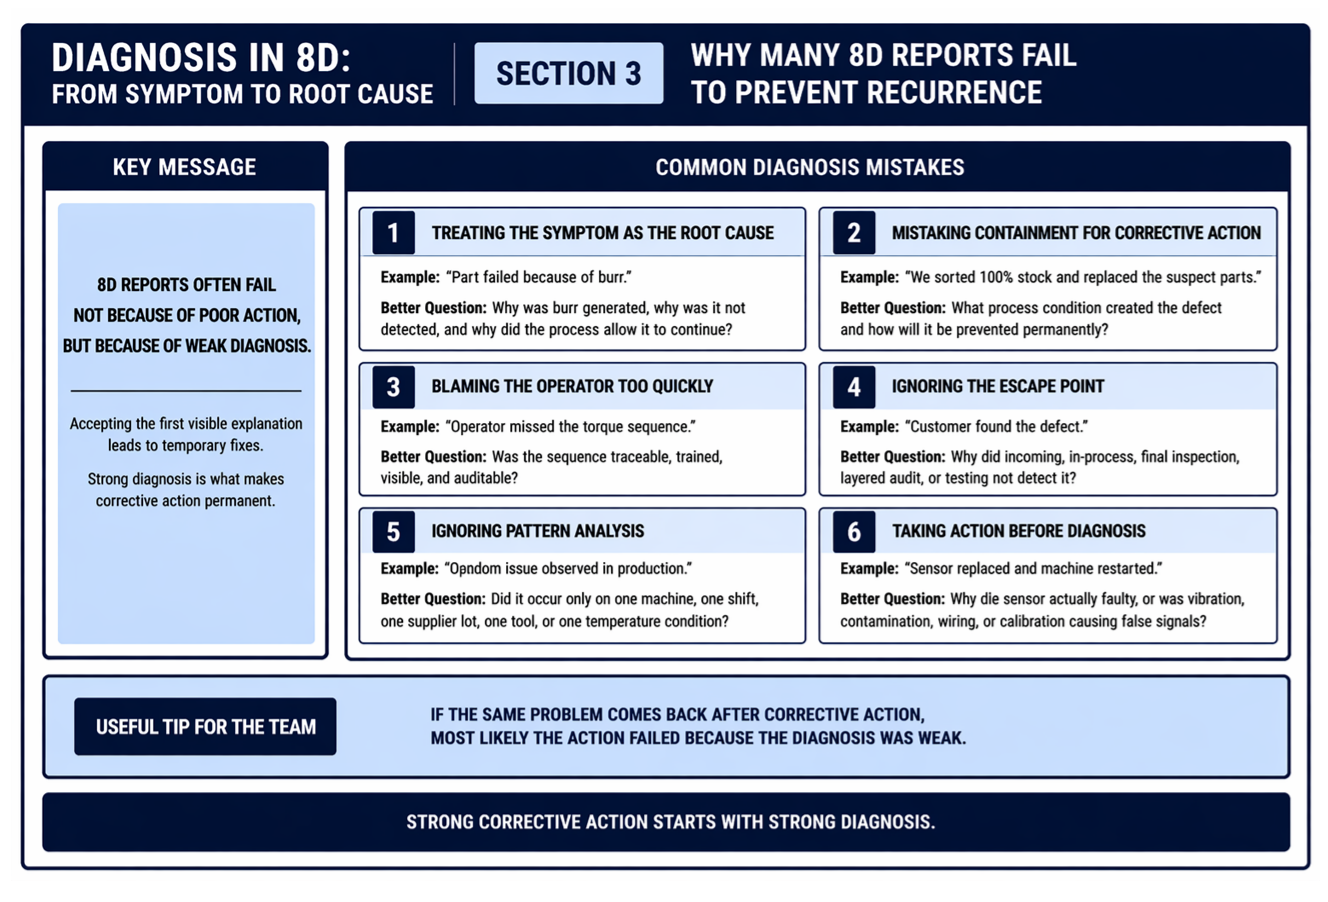
Many 8D reports fail because the team accepts the first visible explanation instead of diagnosing the real reason.
Some of the most common diagnosis mistakes are:
- Treating the symptom as the root cause Example: “Part failed because of burr.” Better question: Why was burr generated, why was it not detected, and why did the process allow it to continue?
- Mistaking containment for corrective action Example: “We sorted 100% stock and replaced the suspect parts.” Better question: What process condition created the defect and how will it be prevented permanently?
- Blaming the operator too quickly Example: “Operator missed the torque sequence.” Better question: Was the sequence traceable, trained, visible, and auditable?
- Ignoring the escape point Example: “Customer found the defect.” Better question: Why did incoming, in-process, final inspection, layered audit, or testing not detect it?
- Ignoring pattern analysis Example: “Random issue observed in production.” Better question: Did it occur only on one machine, one shift, one supplier lot, one tool, or one temperature condition?
- Taking action before diagnosis Example: “Sensor replaced and machine restarted.” Better question: Was the sensor actually faulty, or was vibration, contamination, wiring, or calibration causing false signals?
A useful tip for the team:
If the same problem comes back after corrective action, most likely the action failed because the diagnosis was weak.
Symptom Is Not the Problem
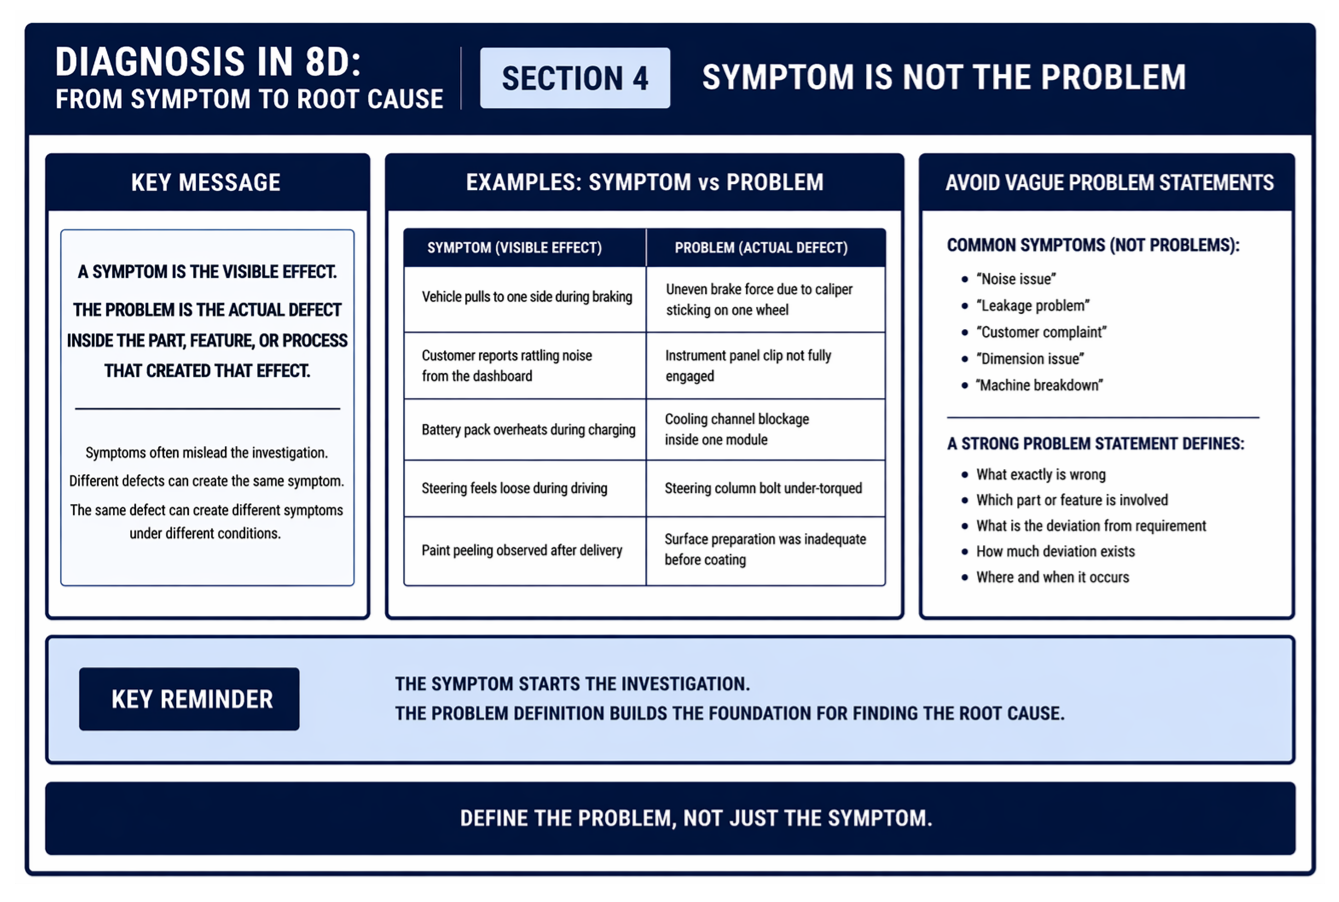
One of the biggest mistakes in problem solving is that teams often treat the symptom as the problem itself. But the symptom is only the visible effect.
The actual problem is the defect inside the part, feature, or process that created that effect.
For example:
- Symptom: Vehicle pulls to one side during braking Problem: Uneven brake force due to caliper sticking on one wheel
- Symptom: Customer reports rattling noise from the dashboard Problem: Instrument panel clip not fully engaged
- Symptom: Battery pack overheats during charging Problem: Cooling channel blockage inside one module
- Symptom: Steering feels loose during driving Problem: Steering column bolt under-torqued
- Symptom: Paint peeling observed after delivery Problem: Surface preparation was inadequate before coating
The distinction is important because symptoms often mislead the investigation.
Different defects can create the same symptom.
Similarly, the same defect can create different symptoms under different conditions.
For example, a loose fastener may create vibration, noise, leakage, fitment issues, or even complete functional failure depending on where it is used. That is why teams should avoid writing vague statements such as:
- “Noise issue”
- “Leakage problem”
- “Customer complaint”
- “Dimension issue”
- “Machine breakdown”
These are symptoms, not problems. A stronger problem statement should define:
- What exactly is wrong
- Which part or feature is involved
- What is the deviation from requirement
- How much deviation exists
- Where and when it occurs
A useful reminder is:
The customer experiences the symptom. The team must identify the problem behind it.
Point of Cause Is Not the Root Cause
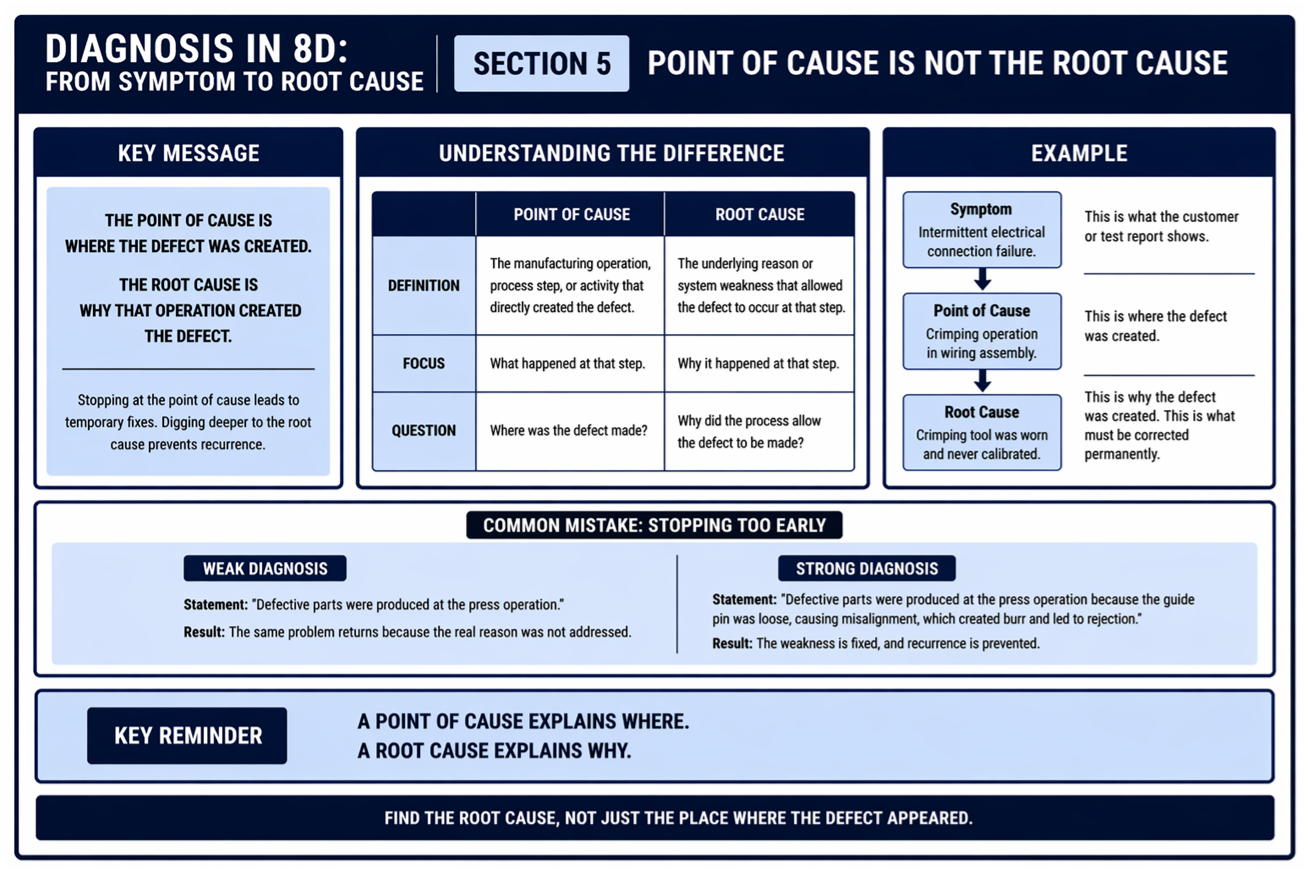
Once the actual problem is defined, the next step is to identify where the defect was created.
This is called the Point of Cause.
The Point of Cause is usually the manufacturing operation, assembly stage, testing activity, material handling stage, or supplier process where the defect originated.
For example:
- Problem: Steering column bolt under-torqued Point of Cause: Final steering column tightening operation
- Problem: Seal incorrectly positioned during assembly Point of Cause: Seal press-fit operation
- Problem: Paint adhesion below specification Point of Cause: Surface cleaning and pre-treatment operation
- Problem: Weld porosity beyond limit Point of Cause: Welding operation
- Problem: Hole diameter oversized Point of Cause: Drilling or reaming operation
But identifying the Point of Cause is still not enough.
Many teams stop here and write statements such as:
- “Issue generated during welding”
- “Problem occurred during assembly”
- “Error happened during machining”
- “Defect created during packaging”
These are only locations where the problem was created. They do not explain why it happened. That deeper answer is the Root Cause.
For example:
- Point of Cause: Welding operation Root Cause: Shielding gas flow below specification due to damaged hose
- Point of Cause: Drilling operation Root Cause: Worn drill bit caused oversized hole diameter
- Point of Cause: Final tightening operation Root Cause: Torque tool battery low, resulting in skipped tightening cycle
- Point of Cause: Seal press-fit operation Root Cause: Locator wear caused incorrect seal positioning
A useful reminder is:
The Point of Cause tells you where the defect was created. The Root Cause explains why it was created.
Escape Point: The Most Ignored Part of 8D
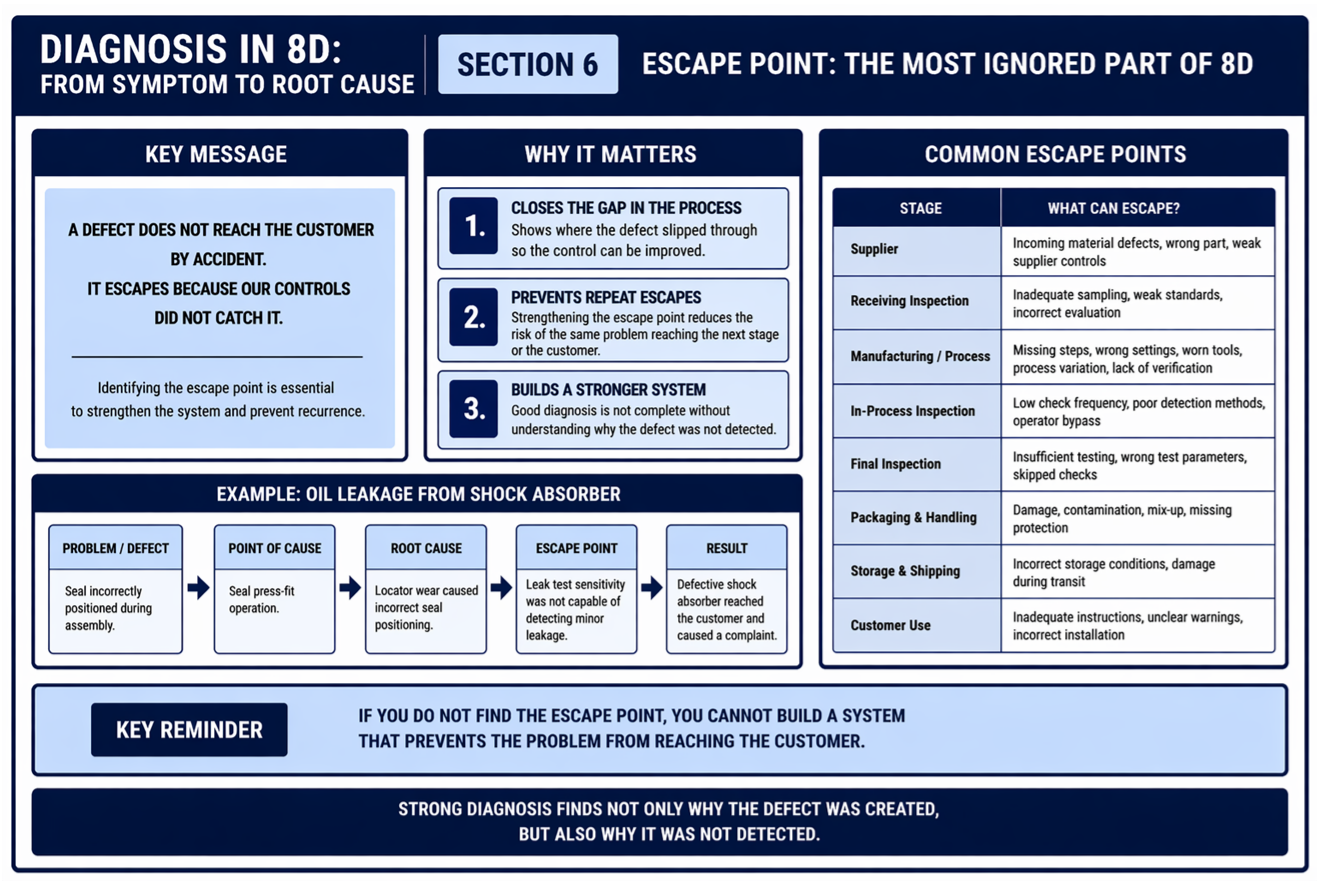
Many teams spend time identifying where the defect was created, but very little time identifying why the defect escaped.
That is a major weakness.
Because even if a defect is created, it should still be detected before reaching the next operation or the customer The Escape Point is the stage where the defect should have been found but was not.
For example:
- Problem: Under-torqued steering column bolt Escape Point: Final inspection did not include torque verification
- Problem: Seal incorrectly positioned during assembly Escape Point: Leak test sensitivity was not capable of detecting minor leakage
- Problem: Weld porosity beyond limit Escape Point: Visual inspection could not detect internal porosity
- Problem: Hole diameter oversized Escape Point: Sampling frequency too low to detect tool wear trend
- Problem: Wrong part assembled Escape Point: Barcode verification was bypassed during assembly
Many organisations only ask:
- Where was the defect created?
- Why did it happen?
But they forget to ask:
- Why was it not detected?
- Which control failed?
- Was the inspection method capable?
- Was the sampling frequency adequate?
- Was the test method sensitive enough?
- Was the traceability or verification system working?
If the Escape Point is not understood properly, the same defect may continue to reach the customer even after the original cause is corrected.
A useful reminder is:
A defect reaching the customer is not only a failure of production. It is also a failure of detection.
Why Teams Jump Too Quickly to Root Cause
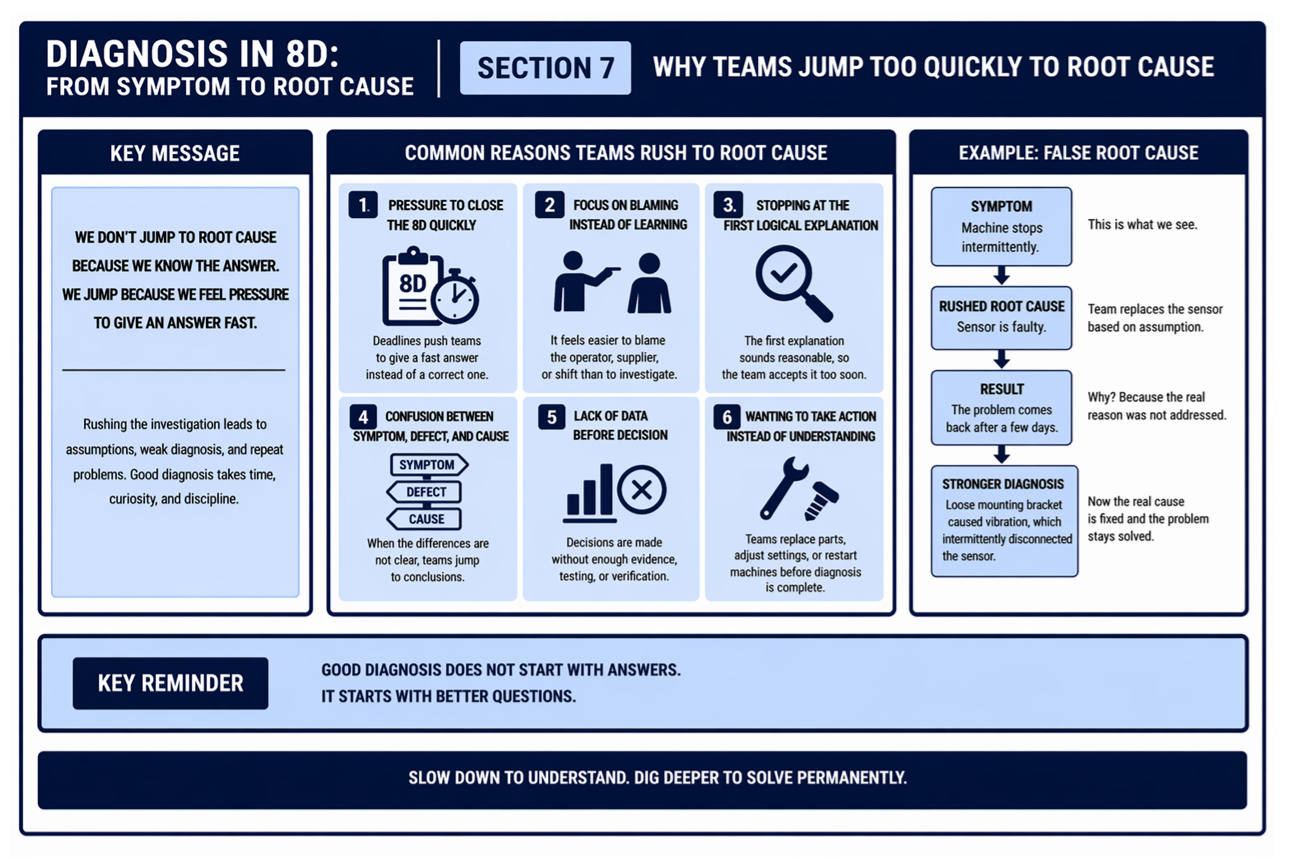
Most teams do not skip diagnosis because they do not know how. They skip it because they are under pressure.
The customer wants an immediate answer. Production wants the line to restart. Management wants closure. The quality team wants to issue containment quickly.
As a result, the team starts searching for the fastest explanation instead of the correct explanation. This usually leads to statements such as:
- Operator missed the step
- Tool was faulty
- Supplier material issue
- Machine setting problem
- Inspection missed the defect
- Human error
These answers may sometimes be true, but they are often incomplete. A loose bolt may not simply be an operator mistake. The real reason may be:
- Tightening sequence difficult to follow
- Tool battery low
- No torque traceability
- No confirmation signal after tightening
- Mixed model assembly increased confusion
- Work instruction unclear
- Tool maintenance overdue
Similarly, a supplier issue may not only be a supplier issue. The real problem may be:
- Incoming inspection too weak
- Material certification not verified
- Supplier change not communicated
- Different batch characteristics not considered
- Process not robust to normal supplier variation
Fast answers create temporary comfort. But temporary comfort is not permanent problem solving.
A useful reminder is:
The first answer is often the easiest answer, not the correct answer.
Pattern Analysis: The Missing Link in Diagnosis
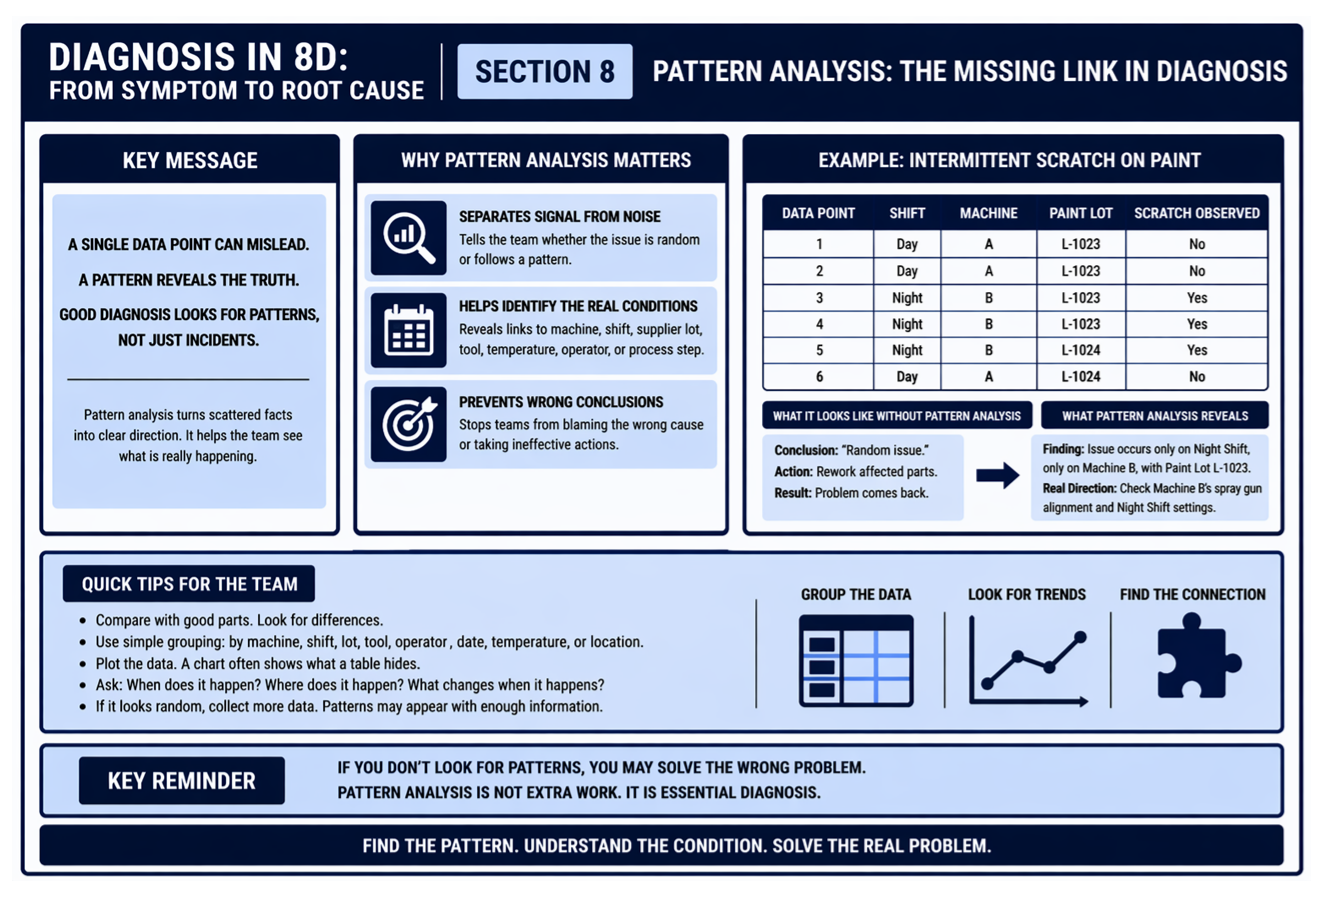
Many defects are not truly random. They only appear random because the team has not looked deeply enough into the pattern.
A good diagnosis should always ask whether the problem is linked to a specific:
- Machine
- Shift
- Operator
- Tool
- Supplier lot
- Material batch
- Temperature
- Humidity
- Program version
- Cavity
- Fixture
- Maintenance activity
- Time period
- Product variant
For example:
- A leak issue may happen only on one seal batch
- A torque issue may appear only during night shift
- A welding defect may increase after tip dressing
- A dimensional issue may appear only on one fixture
- A scratch defect may occur only after packaging change
- A software issue may happen only in one version release
- A porosity issue may increase only in rainy season due to moisture variation
Without pattern analysis, teams often call problems “intermittent” or “random.” But in many cases, the issue is not random at all. It is simply linked to a condition that nobody has studied properly.
That is why good diagnosis should always include stratification of data.
A useful reminder is:
If a problem looks random, it usually means the pattern has not yet been found.
Weak Diagnosis vs Strong Diagnosis
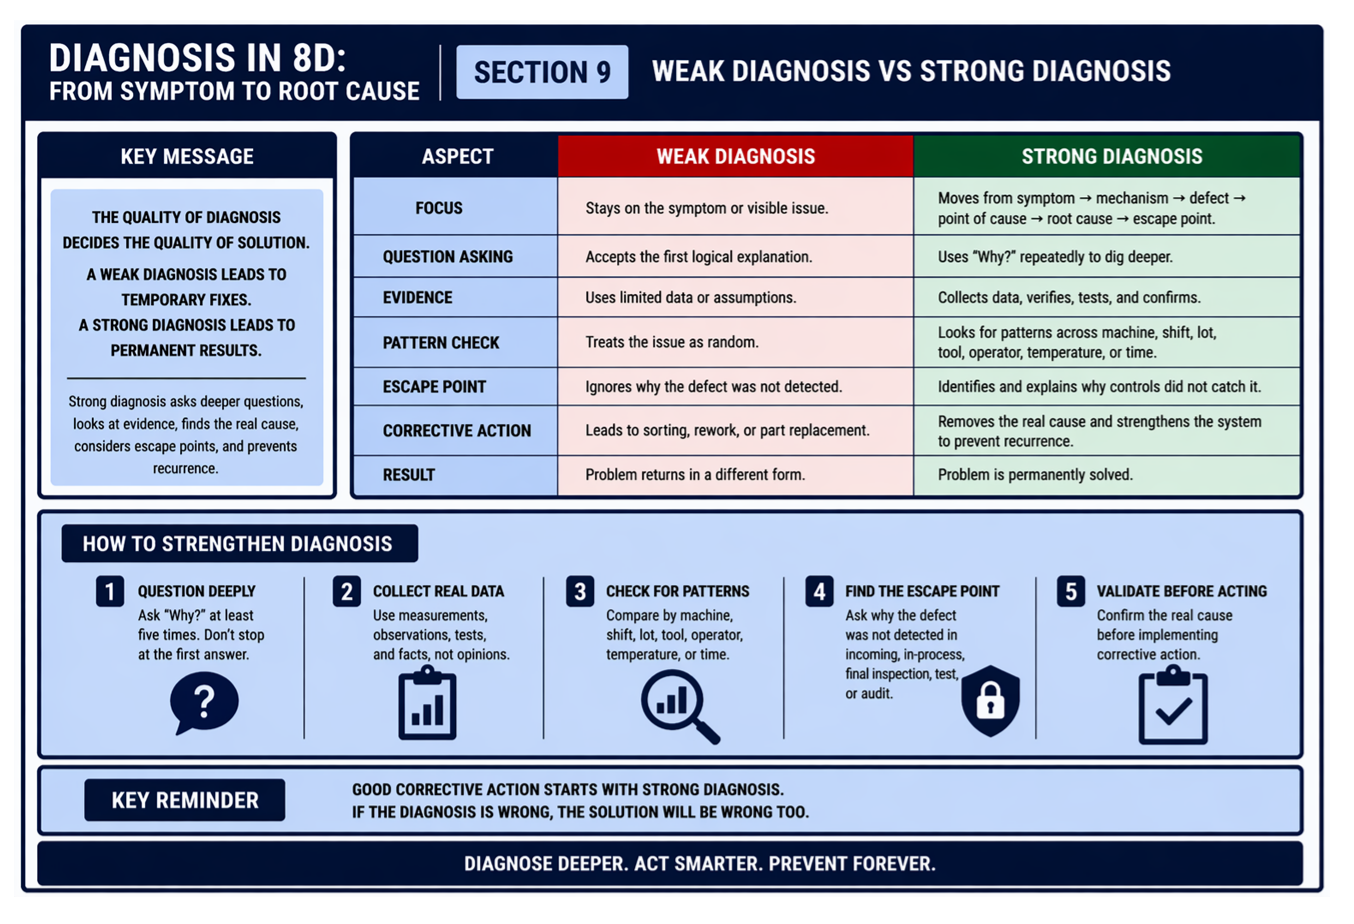
The difference between weak diagnosis and strong diagnosis is usually the difference between temporary correction and permanent prevention. Weak diagnosis stays at the symptom level.
Strong diagnosis follows the complete path from symptom to defect, from defect to manufacturing operation, and from manufacturing operation to root cause and escape point.
For example:
- Symptom: Customer reports steering vibration
- Weak Diagnosis: Wheel issue found
- Strong Diagnosis:
Another example:
- Symptom: Customer reports oil leakage
- Weak Diagnosis: Seal problem
- Strong Diagnosis:
A weak diagnosis often uses broad words such as:
- Operator issue
- Machine problem
- Supplier issue
- Process variation
- Human error
- Inspection miss
A strong diagnosis is much more specific. It identifies:
- What failed
- Which part failed
- What defect existed
- Which operation created it
- Why it happened
- Why it escaped detection
A useful reminder is:
Corrective action becomes powerful only when diagnosis becomes specific.
Final Thoughts: Diagnosis Is the Foundation of 8D
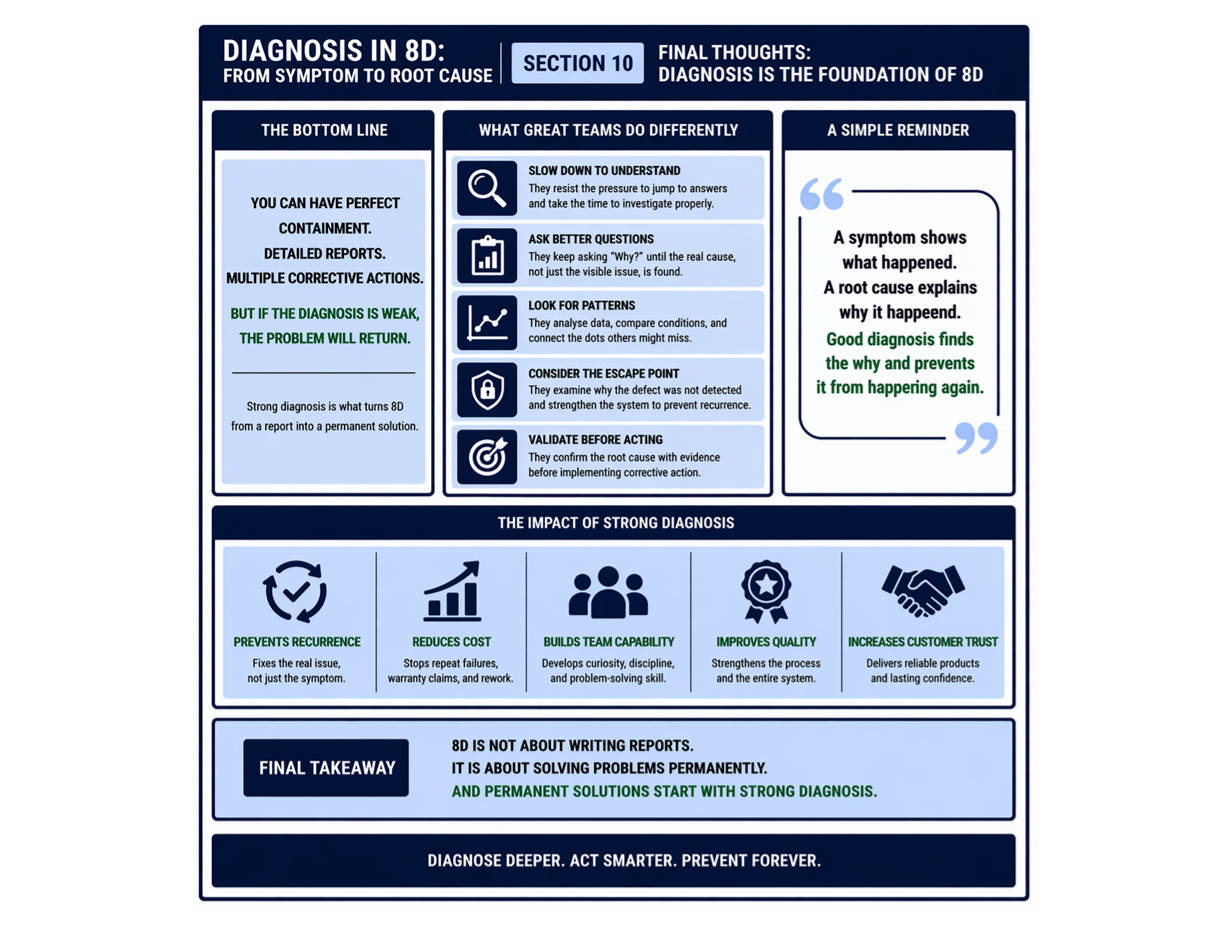
Most teams believe that 8D is about containment, corrective action, and closure. But in reality, the strength of an 8D depends on the quality of its diagnosis. If the symptom is misunderstood, the wrong part will be investigated.
If the failed mechanism is misunderstood, the wrong defect will be analysed. If the defect is misunderstood, the wrong manufacturing operation will be blamed. And if the Point of Cause, Root Cause, and Escape Point are misunderstood, the same issue will return again in a different form.
That is why diagnosis is the silent discipline of 8D problem solving. It is not visible like containment. It is not celebrated like corrective action. It is not highlighted like customer closure.
But it is the step that decides whether the team permanently solves the problem or simply manages it for some time.
A useful reminder for every team is:
A symptom is where the investigation starts. Diagnosis determines where it goes.
A Simple Flow for Better Diagnosis
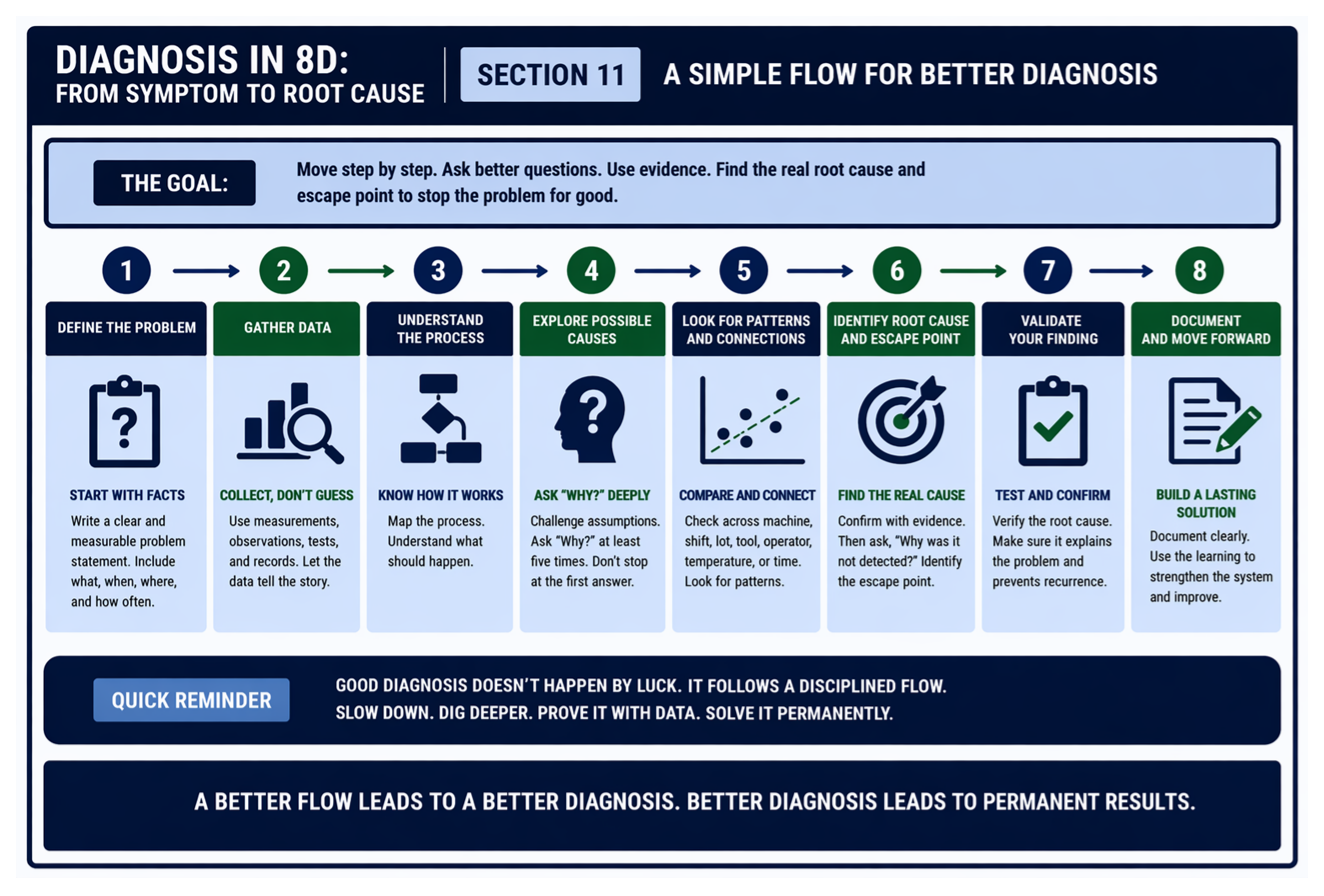
Teams can improve diagnosis quality by following a simple sequence before starting root cause analysis:
- Define the symptom clearly
- Identify the failed mechanism or part
- Define the actual defect or failure mode
- Identify the manufacturing operation where the defect was created
- Analyse why that operation created the defect
- Identify why the defect escaped detection
- Validate the logic with evidence before finalising corrective action
A simple example looks like this:
- Symptom: Customer reports loose steering feel
- Mechanism / Failed Part: Steering column assembly
- Problem / Defect: Steering column bolt under-torqued
- Point of Cause: Final tightening operation
- Root Cause: Torque tool battery low, resulting in skipped tightening cycle
- Escape Point: Final inspection did not include torque verification
This type of structured thinking reduces guesswork and improves the quality of both containment and corrective action.
A useful reminder is:
Strong corrective action starts with strong diagnosis.